How to make a denim rug

How to make a denim rug
Wat do you need:
denim in 5-7 different shades of blue. I suggest using old jeans or a shirt you’ve been meaning to get rid of, or hitting up the local thrift stores to find a few different shades without paying too much. Look for wide leg jeans, larger sizes, shirts in the men’s section, or dresses from the ’90s that have embroidery on them and won’t be enjoyed by someone else.
-one yard of cotton bating.I suggest about a yard, but you can always double up for an even softer bath mat. emroidery thread
-one yard of grip tight cloth.
-one skein of emroidery thread.
-hexagon template (make your own based on the size hexagon you want, see photo below for mine)
–straight pins

Step 1
Print out your hexagon template and cut it out. Use your self-healing mat, acrylic ruler, and rotary cutter to cut through at least two layers of denim at a time.

Step 2
If you’re cutting it out from denim jeans, be sure your hexagon shape has a flat line on the sides instead of a point on the sides. This will help you be more efficient with your denim and get more hexies per pant leg.

Step 3
Cut about 50 hexagons from the various shades of denim you’re using. You only need 46 hexies for this project, but you may want to play with your denim shades and have some choices near the end.

Step 4
Arrange your hexagons with five in a row and then six in a row until you have nine rows. You’ll later cut off the excess tops and bottoms to make a smooth perimeter.

Step 5
To start sewing your hexies together, line up one set of edges.
Note: When lining up your hexies, be aware of which direction the grain of your denim is running. I like to keep the ones with visible grains facing the same direction because it feels a bit cleaner. Just something to pay attention to if it would bother you later.
Step 6
Fold the bottom one onto the top one so that the right sides of the fabric are facing each other and pin along the edge you want to sew together.
Step 7
This is the most important part. Start stitching 1/4″ after the left angle and end your stitching about 1/4″ before the right angle. If you stitched all the way to the angles, you wouldn’t have any wiggle room for when you join another hexagon and then fold it flat.
I suggest backstitching at the beginning and end of your seam, but be sure you aren’t getting too close to those angles.

Step 8
Fold it flat and iron. Do this as you add each hexagon to help keep things flat when you add another hexagon.

Step 9
You can stitch rows so that you have five hexagons one after another, or you can just organically add one at a time. Here’s how you add another hexagon and sew more than one side together.

Step 10
Choose the first side you will sew and fold it onto that hexagon with the right sides facing together. Pin those two edges together.
Step 11
Stitch together, making sure you leave some space around your angles.
Step 12
Remove pins, fold flat.

Step 13
Place the top hexagon shown onto the hexagon below it so that right sides are facing together and match up the angles as best you can. Pin together and stitch.
Step 14
Be sure you are ironing down your seams as you go.

Step 15
If you are sewing your mat together in rows, you can start at the top and fold, pin, and sew as you go.

Step 16
Once you’ve stitched your rows together, cut the excess halves off the top and bottom with your ruler and rotary cutter.

Step 17
This is what it should look like so far. Notice the top and bottom edges are straight.Cut off the flaps on the top and bottom edges as shown.Cut off the last two angles on the right side for a straight edge. Cut off the top and bottom angles as shown. Repeat for the opposite side. This will give you an oval-shaped mat when you are done.

Step 18
Place your batting on the floor first. Then center your grip tight cloth on the batting with the right side facing up.
Finally, place your patchwork mat on top of your grip tight cloth with the right side facing down. Pin around the perimeter and in the middle. Be sure your pins go through all three layers.

Step 19
Stitch around the perimeter of the mat, leaving about 6″ of space open so you can turn it right side out.
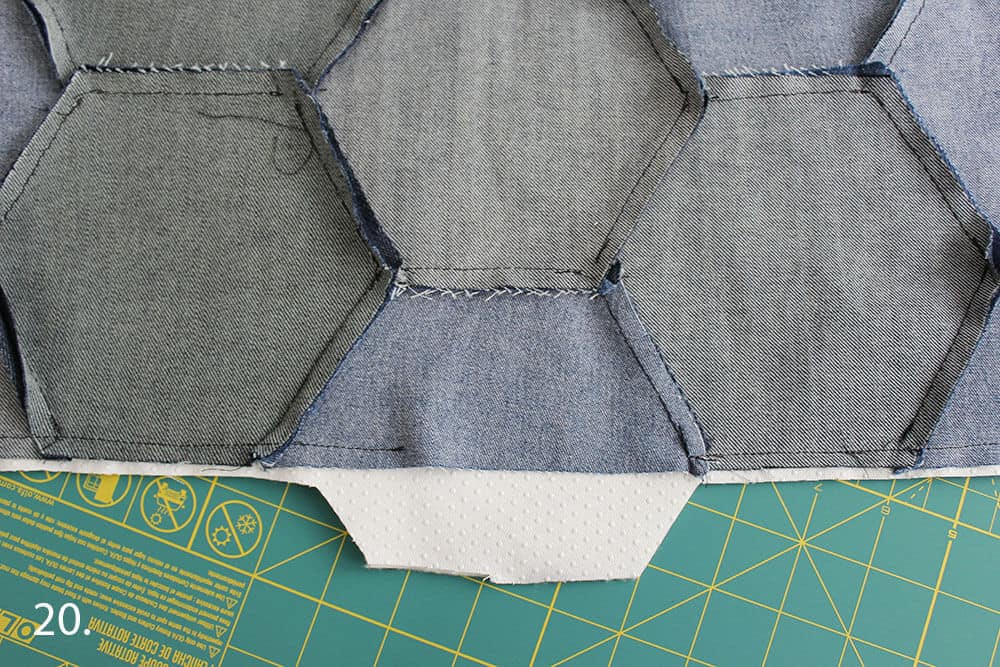
Step 20
Trim the excess fabric from the edge of your mat, but leave the excess near your opening. Remove pins.
Step 21
Turn it right side out and smooth out your edges. You can see where the opening is below. Tuck the excess fabric in and iron on a low setting so that you don’t accidentally melt the grip tight fabric.
Pin your opening shut and stitch along the perimeter of your mat, leaving about 1/4″ seam allowance. This will help your mat retain its shape and close your opening at the same time.

How to make an original candle holder with dried flowers

How to make a vase out of concrete

How to make jewelry out of denim

How to make a candleholder with cement

How to make a vase out of popier mache