Papercraft Tortoise step-by-step

Let`s learn how to make a papercraft tortoise. In fact, I (so far) came up with two models of paper turtles. The body, legs, head and tail are the same. The difference (but big) is only in the method of manufacturing the shell.
DIY papercraft tortoise -1
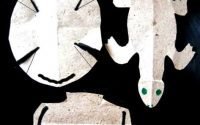
So, first learn how to make the little animal itself.

I cut them, put them to the cardboard, circled them in pencil and cut them:

On the two arcuate details you can see the slits in the middle. This grooves to insert them into each other.

Make bends on the neck and tail.

These are valves for gluing.

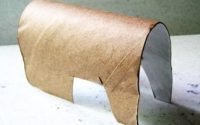
I made shells from two identical circles of paper with a diameter about the length of a turtle’s pitch.

I folded the first round like this:

Then I made a lot of cuts:

Very carefully unfolded and received a “napkin”.

It remained to simply put it on the dome-shaped turtle.

DIY papercraft tortoise 2
I cut the second circle in a spiral:

And this spiral was put on the same base:

To fix these shaky designs, I cut slots at the base of the legs and wound the edges of the shell into them.
Another lesson on making a DIY turtle model is here: Paper Turtle.